| Redirect Management Feature | Webflow Supported | Platform Limitation |
|---|---|---|
| Built-in redirect management system | ✓ | |
| Paid plan requirement | ✓ | |
| Bulk CSV import for large migrations | ✓ | |
| Safe bulk import (preserves existing) | ✓ | |
| Wildcard redirects | ✓ | |
| Domain alias redirects | ✓ | |
| Redirect chain detection | ✓ | |
| External domain redirects | ✓ | |
| Multiple redirect hop prevention | ✓ | |
| Total number of redirects | ✓ | |
| Immediate activation (no publish required) | ✓ | |
| Detailed error reporting | ✓ |
Where Do I Find Redirects in Webflow?
Finding the redirect settings in Webflow is a common challenge. The redirect management panel is not accessible from the Designer or Editor interfaces, which causes confusion for many users.
To access your redirect settings:
- Go to your Webflow Dashboard (not the Designer)
- Select your site
- Click Site Settings (gear icon)
- Click the Publishing tab in the left sidebar
- Scroll down to find the 301 Redirects section
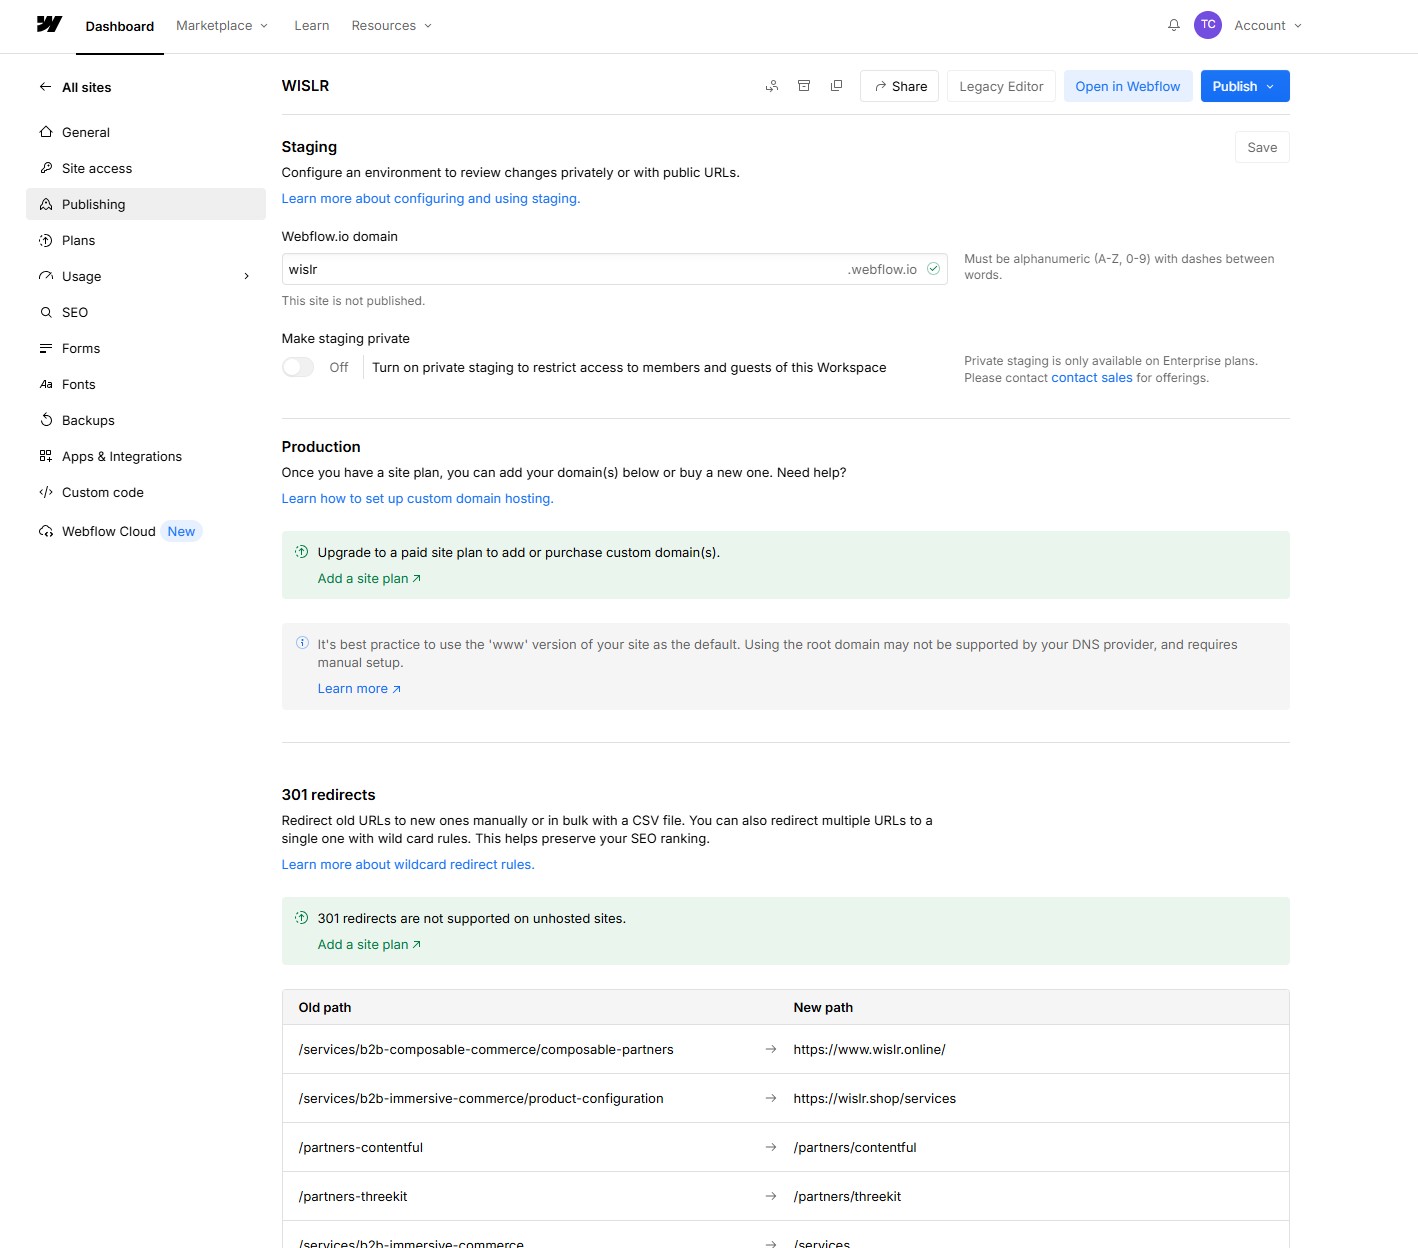
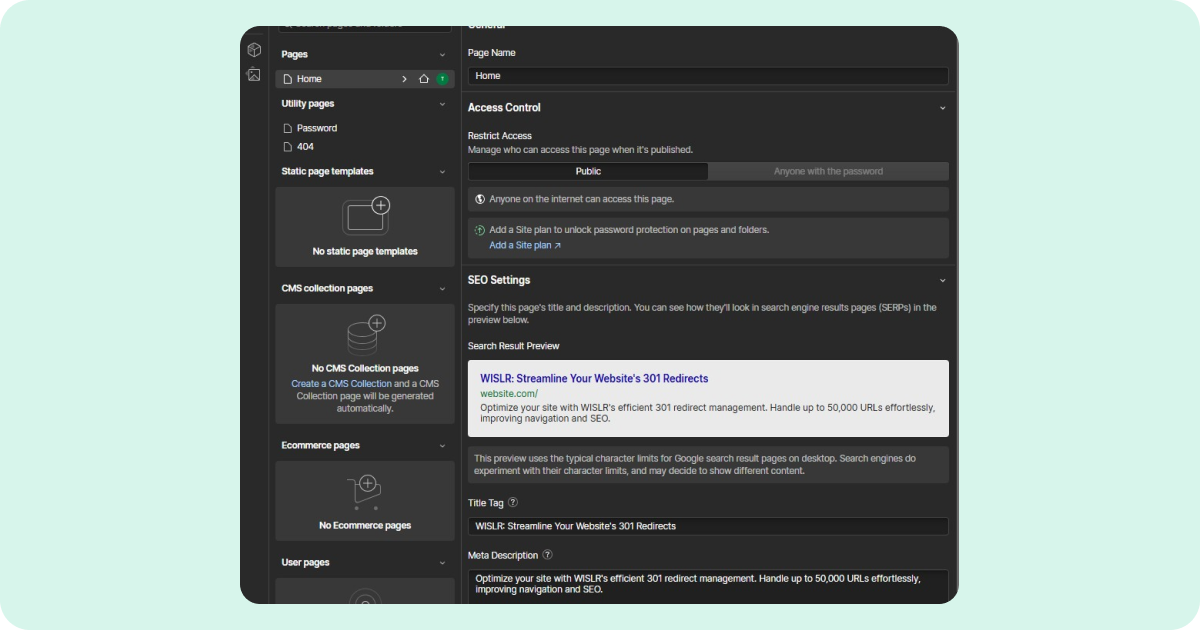
The redirect panel shows two columns: Old path and New path. From here you can:
- Add individual redirects manually
- Import redirects from a CSV file
- Export your existing redirects
- Delete all redirects
Does Webflow Have a Built-In Redirect Management System?
Yes, Webflow provides a built-in redirect management system accessible through Site Settings → Publishing → 301 Redirects. However, this feature requires a paid hosting plan - redirect functionality is not available on free plans.
Individual Redirect Creation
Best for:
- Single redirect creation
- Testing redirect behavior
- Quick fixes and updates
- Small sites with minimal redirect needs
Bulk CSV Import
Best for:
- Large-scale migrations (hundreds or thousands of redirects)
- Multi-URL updates
- Systematic redirect planning
- Importing from other platforms
URL Path Requirements
“Old Path” Field:
- Relative paths only (no domain name)
- Must start with forward slash
/ - Example:
/old-page
“Redirect to” Field:
- Relative OR absolute paths accepted
- Examples:
/new-pageorhttps://www.external.com/page
Where to Find Redirect Settings
- From your Webflow dashboard, go to Site Settings
- Click Publishing tab
- Scroll to 301 Redirects section
Does Webflow’s Bulk Import Preserve Existing Redirects?
No. New imports overwrite all existing redirects. When you upload a CSV file of 301 redirects, it removes any existing redirects on your site. This is the most critical limitation to understand before using the bulk import feature.
The Data Destruction Risk
Unlike platforms that append new redirects to existing ones, Webflow’s bulk import performs a complete replacement operation:
What happens during bulk import:
- Webflow deletes ALL existing redirects
- Webflow imports only the redirects in your CSV file
- Any redirects not in the CSV file are permanently lost
- There is no undo option
Safe Bulk Import Process
Required steps to preserve existing redirects:
- Export existing redirects - Go to Site Settings > Publishing > 301 Redirects and click Export. You will receive a notification in Webflow and an email with a link to download your CSV file.
- Merge redirect lists - Add your new redirects to the exported CSV file
- Validate the complete list - Check for duplicates and format errors
- Import the combined file - Go to Site Settings > Publishing > 301 Redirects, click Import, and drag in your CSV file or browse for it
- Publish your site - Redirects only take effect after publishing
CSV File Format Requirements
Webflow requires a specific CSV format:
| Requirement | Details |
|---|---|
| Columns | Exactly 2 columns required |
| Headers | Any values accepted (Webflow ignores header row) |
| Column 1 | Old paths in relative format (must start with /) |
| Column 2 | Redirect destinations (relative or absolute URLs) |
| Encoding | UTF-8 recommended |
| Max File Size | 16MB |
Example CSV format:
Old Path,Redirect To
/old-page,/new-page
/legacy-product,https://store.example.com/product
/blog/old-post,/blog/new-post
/about-us,/about
How to Delete All Redirects
You can delete all existing redirects by going to Site Settings > Publishing > 301 Redirects and clicking Delete All. In the confirmation modal, you can export your redirects as a backup before deleting them. Only site managers can delete all 301 redirects. You must publish your site for the deletion to take effect.
Does Webflow Support Wildcard Redirects?
Yes, Webflow supports wildcard redirects using capture groups. This allows you to redirect multiple URLs matching a pattern with a single redirect rule, which is useful for large-scale URL structure changes.
How Wildcard Redirects Work in Webflow
Webflow uses capture groups written as (.*) to match variable portions of URLs. You reference these captured values in the destination path using %1, %2, and so on.
Basic wildcard example:
| Field | Value |
|---|---|
| Old Path | /collections/(.*) |
| Redirect To | /collections |
This redirects all URLs like /collections/women, /collections/men, and /collections/children to a single /collections page.
Preserving the URL slug:
| Field | Value |
|---|---|
| Old Path | /blog/(.*) |
| Redirect To | /articles/%1 |
This redirects:
/blog/my-postto/articles/my-post/blog/summer-2024to/articles/summer-2024/blog/how-to-guideto/articles/how-to-guide
Multiple Capture Groups
You can use multiple capture groups to restructure complex URLs. Each (.*) becomes a numbered variable you can reference in the destination.
Example with two capture groups:
| Field | Value |
|---|---|
| Old Path | /%?category%=(.*)%&post%=(.*) |
| Redirect To | /blog/%1/%2 |
This redirects:
/?category=music&post=beyonceto/blog/music/beyonce/?category=travel&post=londonto/blog/travel/london/?category=food&post=pieto/blog/food/pie
Escape Characters in Old Path
Webflow requires you to escape special characters in the Old Path field by placing a % symbol before them. This applies to these characters:
| Character | Escaped Version |
|---|---|
% |
%% |
- |
%- |
& |
%& |
* |
%* |
( |
%( |
) |
%) |
= |
%= |
_ |
%_ |
+ |
%+ |
? |
%? |
Example with query string:
To redirect mysite.com?category=food to mysite.com/blog/food:
| Field | Value |
|---|---|
| Old Path | %?category%=food |
| Redirect To | /blog/food |
Is It Safe to Use Wildcard Redirects in Webflow?
Yes, wildcard redirects in Webflow are safe to use when configured correctly. However, there are some considerations:
Best practices for wildcard redirects:
- Test with a few URLs first before relying on the pattern for your entire site
- Be specific with your patterns to avoid accidentally redirecting URLs you want to keep
- Order matters if you have overlapping patterns, as Webflow processes redirects in order
- Escape all special characters in the Old Path or the redirect will not work as expected
Common mistakes to avoid:
| Mistake | Problem | Solution |
|---|---|---|
Using * instead of (.*) |
Webflow treats * as a literal character |
Use (.*) for capture groups |
Forgetting to escape ? in query strings |
Redirect will not match | Write %? instead of ? |
Not escaping = in parameters |
Redirect will fail | Write %= instead of = |
Using $1 instead of %1 |
Wrong syntax for Webflow | Use %1, %2, etc. |
Does Webflow Handle Custom Domain Redirects Properly?
Webflow supports custom domains and automatic redirects between them, but the implementation can create up to 3 redirect hops - violating SEO best practices and impacting site performance.
The Multiple Redirect Hop Problem
When using custom domains with Webflow, a single URL request can trigger multiple redirects:
Example redirect chain:
User Request: example.com/old-page
  ↓ (301 Redirect #1)
www.example.com/old-page
  ↓ (301 Redirect #2)
newsite.webflow.io/old-page
  ↓ (301 Redirect #3)
www.newsite.webflow.io/old-page (Final destination - 200 OK)
Performance & SEO Impact
| Impact Category | Effect | Consequence |
|---|---|---|
| Page Load Speed | +100-300ms per hop | Slower user experience |
| Search Engine Crawling | May not follow all hops | Reduced indexing efficiency |
| Best Practice Violation | Exceeds 2-hop recommendation | Potential SEO ranking impact |
| User Experience | Increased loading time | Higher bounce rates possible |
Why This Happens
Webflow’s architecture processes redirects at multiple levels:
- Custom domain level - Non-www to www (or vice versa)
- Webflow domain level - Custom domain to default Webflow domain
- Path redirect level - Your configured URL redirects
Each level can add a redirect hop, creating chains.
Mitigation Strategies
Recommended solutions:
- Configure DNS properly - Handle www/non-www redirects at the DNS level when possible
- Monitor redirect chains - Use tools like Screaming Frog to audit redirect behavior
- Test performance - Measure actual impact on your specific domain setup
- Minimize intermediate hops - Keep redirect paths as direct as possible
Do Redirects Activate Immediately in Webflow?
No, redirects in Webflow do not activate immediately when you add or import them. You must manually republish your site for redirect changes to take effect.
Required Activation Process
| Step | Action | Status | Notes |
|---|---|---|---|
| 1 | Add or import redirects | Staged | Redirects exist but are inactive |
| 2 | Review redirect list | Ready | Confirm all redirects are present |
| 3 | Click “Publish” | Critical | Makes redirects live |
| 4 | Wait for propagation | Active | Usually instant, up to 5 minutes |
Common Activation Issues
“Redirects not working after import”
- Cause: Site wasn’t republished after adding redirects
- Solution: Click the “Publish” button in Webflow Designer
“Some redirects are missing”
- Cause: Bulk import overwrote existing redirects
- Solution: Re-import complete redirect list including old and new redirects
“Redirects work intermittently”
- Cause: Propagation delay or browser caching
- Solution: Wait 5 minutes, test in incognito mode
“404 errors persist”
- Cause: Path formatting doesn’t match exactly
- Solution: Verify old path format matches incoming URLs exactly
How Does Webflow Handle Import Errors?
If your CSV file includes any invalid redirects, the import will fail. Webflow will send you an email with a link to download your original CSV file with guidance to correct the invalid redirect errors. You will also receive a notification in the Dashboard with a link to download your CSV file.
Common Import Errors
| Error Type | Cause | Solution |
|---|---|---|
| Redirect Chains | A to B to C pattern detected | Create direct redirects (A to C) |
| Invalid Paths | Missing / or wrong format |
Fix path formatting |
| Duplicate Entries | Same old path appears twice | Remove duplicates |
| Special Characters | Unescaped characters in Old Path | Escape with % symbol |
Error Resolution Process
- Check your email - Webflow sends an email with a link to download your CSV file with error guidance
- Check Dashboard notifications - You can also download the error file from there
- Identify patterns - Look for common issues across multiple rows
- Fix source data - Correct errors in your original CSV file
- Re-import - Upload corrected file and verify success
Error Message Limitations
- Minimal details - Often just row numbers with basic error types
- No suggested fixes - You must determine solutions independently
- Batch failures - Single error can fail entire import
- Time-consuming - Manual debugging required for each error
What Are Webflow’s Redirect Limits?
Webflow doesn’t publicly document a hard limit on redirect count, but performance can degrade with thousands of redirects. The bulk import system may also timeout with very large files.
Practical Limits Observed
Based on testing and user reports:
- Under 1,000 redirects - Generally works well
- 1,000-5,000 redirects - May experience slower import times
- Over 5,000 redirects - Risk of timeouts and performance issues
Recommended Approach
For large redirect lists:
- Batch imports - Upload in groups of 500-1,000 redirects
- Monitor performance - Test site speed after each batch
- Prioritize critical URLs - Import high-value pages first
- Consider alternatives - For very large sites, evaluate dedicated redirect services